How to activate the new Windows Sandbox feature in Windows 10
Starting with version 1903, a new feature of Windows 10 called Windows Sandbox will be available for devices running only on Pro or Enterprise editions. The feature simply allows users to install and test applications or programs in an isolated virtual environment; That is, create a virtual computer inside the primary computer. Once the testing is done, all you have to do is close the Sandbox window and it will erase everything that you did in this virtual environment. Of course, it is very useful if you need to try many anonymous programs and suspect that they may harm your device, as you can test these programs with them without having any effect on your computer. This feature is not active by default in Windows 10, rather you need to activate it through steps ... Let us review it below.

As we mentioned in the previous lines, activating the Windows Sandbox feature in Windows 10 requires working on version 1903 or above, and the version is Pro or Enterprise. But these are not the only conditions, you will also need to activate the virtualization feature - we explained how to do this before - through the BIOS settings. In addition to the need for a dual-core processor and a size of at least 4 GB RAM (8 GB RAM recommended), there should also be an empty storage space on the hard disk of 40 GB. If these requirements are not met on your device, Windows Sandbox will not function even after the installation process is complete.
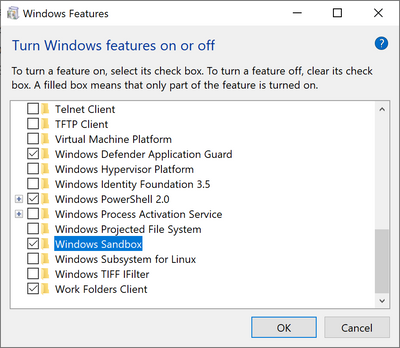
To start activating the Windows Sandbox feature, you will open the Windows Feature window by going to Control Panel, then Programs and Features, and then clicking on the option Turn Windows feature on or off from the side menu. Alternatively, you can quickly open this window by pressing the Win key + the letter R together on the keyboard, then typing "optionalfeatures" in the Run window and clicking the Enter button. From there, scroll down to the bottom until you find the Windows Sandbox feature listed, now put a checkmark (✔) next to it and hit the OK button.

The Windows Sandbox feature is like all Windows features that are activated through this menu, as the files required to run the feature will be downloaded through the Windows Update service, and then the required modifications are applied to the system until it is ready for this feature to work. It will not take much of your time, when everything is done, you will press the Restart now button to restart your device.

Now you will see a Windows Sandbox window which is an isolated virtual environment of Windows 10 where you can do whatever you want away from your main computer, just as if you installed Windows 10 as a virtual system with VirtualBox. The downside is that you are not able to drag and drop files from the primary desktop to the virtual environment desktop. Thus if you intend to test unknown source programs or open a suspicious file, you will need to download this program Inviska_Rename or the file directly from within the Windows Sandbox window via Microsoft Edge browser. However, this remains the first version of the feature, and we may see Microsoft add more new options to it later.


Comments
Post a Comment